Introduction
Samsung devices come with a virtual assistant called Bixby. While some users find it useful, others find it annoying and want to remove it. If you're one of those people, this article is for you. In this article, we'll show you how to remove Bixby from your Samsung device.What is Bixby?
Bixby is a virtual assistant developed by Samsung. It's designed to help users perform tasks on their Samsung devices using voice commands. Bixby can be activated by pressing the Bixby button or by saying "Hi, Bixby."Why Remove Bixby?
While some users find Bixby useful, others find it annoying. Bixby can be accidentally activated when you don't mean to, and it can also interfere with other apps on your device. If you're not using Bixby and want to remove it, you can do so using the following methods.Method 1: Disabling Bixby
The first method to remove Bixby from your Samsung device is to disable it. Here's how to do it:1. Press and hold the Bixby button on your device.
2. Tap the three-dot menu icon in the top-right corner of the screen.
3. Select "Settings."
4. Toggle the "Bixby Voice" switch off.
5. Toggle the "Bixby Home" switch off.
6. Tap "Done."
Method 2: Using Package Disabler Pro
The second method to remove Bixby from your Samsung device is to use a third-party app called Package Disabler Pro. Here's how to do it:1. Download and install Package Disabler Pro from the Google Play Store.
2. Open Package Disabler Pro and search for "Bixby."
3. Select all the Bixby-related apps and tap "Disable."
4. Reboot your device.
Method 3: Using ADB Commands
The third method to remove Bixby from your Samsung device is to use ADB commands. Here's how to do it:1. Enable USB debugging on your device by going to "Settings" > "Developer options" > "USB debugging."
2. Connect your device to your computer using a USB cable.
3. Open a command prompt on your computer and enter the following command: adb shell pm uninstall --user 0 com.samsung.android.bixby.agent
4. Reboot your device.
Conclusion
Removing Bixby from your Samsung device can be done using the methods described above. Whether you choose to disable it or use a third-party app or ADB commands, the process is relatively simple. By removing Bixby, you can free up space on your device and avoid accidentally activating it.Related video of How to Remove Bixby from Your Samsung Device
For gamers, Steam is a popular platform for purchasing and playing games. Steam offers many features that make gaming easier and more enjoyable. One of the features that Steam offers is the option de lancement. This option allows users to launch games in different modes, such as safe mode or windowed mode. In this article, we will discuss the Steam option de lancement and how it can benefit gamers.
What is Steam Option de Lancement?
The Steam option de lancement, also known as launch options, is a feature that allows users to customize how their games are launched. Launch options can be set for each game individually, allowing for greater flexibility and customization. Users can set launch options to change the resolution of the game, enable or disable certain features, or launch the game in a specific mode.
How to Access Steam Option de Lancement?
To access the Steam option de lancement, users need to follow these steps:
- Open Steam and go to the Library tab.
- Right-click on the game you want to customize and select Properties.
- Click on the Set launch options button.
- Enter the launch options you want to use in the text box.
- Click OK to save the changes.
Examples of Steam Option de Lancement
Here are some examples of launch options that users can use:
- -windowed: Launches the game in windowed mode.
- -noborder: Removes the border around the window in windowed mode.
- -w 1920 -h 1080: Sets the resolution of the game to 1920x1080.
- -console: Launches the game with the console enabled.
- -dxlevel 81: Sets the DirectX version to 8.1.
Benefits of Steam Option de Lancement
The Steam option de lancement provides several benefits for gamers:
- Customization: Launch options allow users to customize how their games are launched, making it easier to play the game the way they want.
- Performance: Launch options can improve game performance by adjusting settings such as resolution and DirectX version.
- Troubleshooting: Launch options can be used to troubleshoot issues with the game, such as crashes or graphical glitches.
- Accessibility: Launch options can make games more accessible by enabling features such as windowed mode or the console.
Conclusion
The Steam option de lancement is a powerful feature that allows users to customize how their games are launched. By using launch options, gamers can improve game performance, troubleshoot issues, and make games more accessible. With the ability to set launch options for each game individually, the Steam option de lancement provides gamers with greater flexibility and customization. So, next time you launch a game on Steam, consider using launch options to enhance your gaming experience.
Related video of Steam Option de Lancement
If you are a Windows user, then you must be familiar with the Solitaire Microsoft Collection. It is one of the most popular games that come pre-installed with Windows. The game has been around for decades and has become a staple for many Windows users. In this article, we will take a closer look at the Solitaire Microsoft Collection and why it has become so popular.
The History of Solitaire Microsoft Collection
The history of Solitaire Microsoft Collection dates back to 1990 when it was first introduced in Windows 3.0. The game was designed by Wes Cherry, a Microsoft employee who wanted to create a game that would showcase the graphical capabilities of Windows. The game was an instant hit and became a standard feature in all subsequent versions of Windows.
The Gameplay of Solitaire Microsoft Collection
The gameplay of Solitaire Microsoft Collection is simple and straightforward. The game consists of a deck of 52 cards and the objective is to move all the cards to the four foundation piles in ascending order from Ace to King. The game has different variations, including Klondike, Spider, FreeCell, Pyramid, and TriPeaks.
The Different Variations of Solitaire Microsoft Collection
Klondike is the most popular variation of Solitaire Microsoft Collection. It is also known as Patience or Classic Solitaire. In this game, the player needs to move all the cards to the foundation piles in ascending order from Ace to King. Spider Solitaire is another popular variation, which requires the player to arrange the cards in descending order from King to Ace. FreeCell, Pyramid, and TriPeaks are other variations that offer different challenges and levels of difficulty.
Why Solitaire Microsoft Collection is Popular
Solitaire Microsoft Collection has become popular for several reasons. First, it is a simple and easy-to-learn game that can be played by anyone. Second, it is a great way to pass the time and relieve stress. Third, it is a free game that comes with Windows, which means that users don't need to spend money on purchasing a game. Finally, the game has different variations that offer different challenges, which keeps the game interesting and engaging.
The Future of Solitaire Microsoft Collection
The future of Solitaire Microsoft Collection looks bright. The game has been around for decades and has become a staple for many Windows users. Microsoft has also introduced the game on other platforms, including Android and iOS. The game has also undergone several updates and improvements, including new themes and challenges.
Conclusion
Solitaire Microsoft Collection is a game that has stood the test of time. It has become a standard feature in all versions of Windows and has become a popular game for millions of users worldwide. The game's simplicity and different variations have kept users engaged and interested for decades. With its bright future, Solitaire Microsoft Collection will continue to be a favorite game for many Windows users.
Related video of Solitaire Microsoft Collection: The Most Popular Solitaire Game on Windows
If you're a fan of open-world video games, then you've probably heard of Fallout 76. This game is set in a post-apocalyptic world and allows players to explore, fight, and build in a massive online multiplayer environment. One of the most important aspects of the game is the serveur Fallout 76, where players can connect and play with others from around the world.
What is a Serveur Fallout 76?
A serveur Fallout 76 is essentially a computer that is dedicated to hosting the game for players. It allows multiple players to connect and play together in the same world. The serveur Fallout 76 is responsible for managing all of the game's data, including player locations, items, and events. Without a serveur Fallout 76, the game would not be able to function as an online multiplayer experience.
How to Join a Serveur Fallout 76
To join a serveur Fallout 76, you will need to have a copy of the game and an active internet connection. Once you are in the game, you can select the "Play" option from the main menu and then choose "Join a Serveur". From there, you can browse through the available serveur Fallout 76 options or enter a specific serveur IP address to connect to.
Types of Serveur Fallout 76
There are several types of serveur Fallout 76 that you can join, each with its own unique features and gameplay. Here are some of the most popular types:
- Public Serveurs: These serveur Fallout 76 are open to anyone and allow players to connect and play with others from around the world. They are great for meeting new people and exploring the game's vast world.
- Private Serveurs: Private serveur Fallout 76 are usually reserved for specific groups of players, such as friends or clans. They offer a more controlled environment where players can focus on specific goals or objectives.
- Role-Playing Serveurs: Role-playing serveur Fallout 76 are designed for players who want to immerse themselves in the game's world and story. They often have specific rules and guidelines for players to follow, such as staying in character or avoiding certain actions.
How to Create Your Own Serveur Fallout 76
If you want to create your own serveur Fallout 76, there are several steps you will need to follow:
- Choose a Hosting Provider: You will need to choose a hosting provider that offers dedicated server hosting for Fallout 76. Some popular options include Nitrado, Survival Servers, and GameServers.com.
- Configure Your Serveur: Once you have chosen a hosting provider, you will need to configure your serveur Fallout 76 to meet your specific needs. This may include setting up custom rules or mods.
- Invite Players: Once your serveur Fallout 76 is up and running, you can invite other players to join. You can do this by sharing your serveur IP address or by setting up a password-protected serveur and sharing the password with specific players.
Benefits of Using a Serveur Fallout 76
Using a serveur Fallout 76 has several benefits for players:
- Multiplayer Experience: A serveur Fallout 76 allows players to connect and play with others from around the world, creating a dynamic and exciting multiplayer experience.
- Customization: With your own serveur Fallout 76, you can customize the game to meet your specific needs, such as setting up custom rules or mods.
- Control: Hosting your own serveur Fallout 76 gives you greater control over the game environment, allowing you to focus on specific goals or objectives.
Conclusion
A serveur Fallout 76 is an essential part of the game's online multiplayer experience, allowing players to connect and play with others from around the world. Whether you join a public serveur or create your own, using a serveur Fallout 76 offers numerous benefits for players. So, if you're a fan of Fallout 76, be sure to give it a try!
Related video of Serveur Fallout 76: A Comprehensive Guide
Have you ever lost important data or files due to a computer crash or accidental deletion? If so, you know how frustrating and time-consuming it can be to recover them. That's where sauvagarde et synchronisation come in.
What is Sauvegarde?
Sauvegarde is a French word that translates to backup in English. It refers to the process of creating a copy of your data and files to protect them from loss or damage. Sauvegarde can be done manually or automatically using specialized software.
The importance of sauvegarde cannot be overstated. Without it, you risk losing all your important data in case of a system failure, malware attack, or human error. Sauvegarde ensures that you have a copy of your data in a safe place that you can easily retrieve if needed.
What is Synchronisation?
Synchronisation is the process of ensuring that two or more devices or systems have the same data at the same time. It involves updating, copying, and reconciling data between devices or systems to ensure that they are in sync.
Synchronisation is important in situations where you use multiple devices or systems to access and edit your data. Without synchronisation, you risk having different versions of the same data on different devices, which can lead to confusion and errors.
Why Sauvegarde and Synchronisation are Important
Sauvegarde and synchronisation are important for several reasons:
- They protect your data from loss or damage
- They ensure that you have access to your data at all times
- They prevent data inconsistencies and errors
- They save time and effort in case of data loss or system failure
How to Implement Sauvegarde and Synchronisation
Implementing sauvegarde and synchronisation is relatively easy and straightforward. Here are some steps to follow:
- Identify the data and files that need to be backed up and synchronized
- Select a sauvegarde and synchronisation solution that meets your needs
- Install and configure the sauvegarde and synchronisation software
- Set up a backup schedule and synchronization rules
- Monitor the sauvegarde and synchronisation process to ensure that it is working correctly
Types of Sauvegarde and Synchronisation Solutions
There are several types of sauvegarde and synchronisation solutions available, each with its own benefits and drawbacks:
- Cloud-based sauvegarde and synchronisation solutions: These solutions store your data in the cloud, providing easy access and scalability. However, they can be expensive and may have security concerns.
- External hard drive sauvegarde and synchronisation solutions: These solutions store your data on an external hard drive, providing an affordable and portable option. However, they require manual intervention and can be lost or stolen.
- Network-attached storage sauvegarde and synchronisation solutions: These solutions store your data on a dedicated device on your network, providing easy access and automatic sauvegarde and synchronisation. However, they can be expensive and require technical expertise to set up.
Best Practices for Sauvegarde and Synchronisation
To ensure that your sauvegarde and synchronisation process is effective and reliable, here are some best practices to follow:
- Back up your data regularly, preferably daily or weekly
- Test your sauvegarde and synchronisation solution regularly to ensure that it is working correctly
- Keep multiple copies of your data in different locations for extra protection
- Encrypt your data to protect it from unauthorized access
- Choose a sauvegarde and synchronisation solution that is easy to use and meets your needs
The Bottom Line
Sauvegarde and synchronisation are essential processes that protect your data from loss or damage, ensure that you have access to your data at all times, and prevent data inconsistencies and errors. By implementing sauvegarde and synchronisation best practices and choosing the right solution for your needs, you can rest assured that your data is safe and secure.
Related video of Sauvegarde et Synchronisation: What You Need to Know
Hair care is an important aspect of our daily routine. We use various products to keep our hair healthy and shiny. However, not all products are effective, and some may even harm our hair. If you are looking for a natural solution for your hair care, then consider using romarin séché pour cheveux. In this article, we will discuss the benefits of using dried rosemary for hair and how to use it.
What is Romarin Séché Pour Cheveux?
Romarin séché pour cheveux is dried rosemary that is used for hair care. Rosemary is a herb that is known for its medicinal properties. It has anti-inflammatory, anti-fungal, and anti-bacterial properties. It is also rich in antioxidants and essential oils. When used on hair, it can help to improve hair growth, reduce dandruff, and prevent hair loss.
Benefits of Romarin Séché Pour Cheveux
There are several benefits of using romarin séché pour cheveux for hair care. Some of these benefits are:
- Improves hair growth: Rosemary contains carnosic acid, which has been shown to stimulate hair growth.
- Reduces dandruff: The anti-bacterial and anti-inflammatory properties of rosemary can help to reduce dandruff and relieve an itchy scalp.
- Prevents hair loss: Rosemary can help to prevent hair loss by improving blood circulation in the scalp and stimulating hair follicles.
- Conditions hair: Rosemary contains essential oils that can help to moisturize and condition hair, making it soft and shiny.
How to Use Romarin Séché Pour Cheveux
There are several ways to use romarin séché pour cheveux for hair care. Some of these are:
- As a hair rinse: Boil a handful of dried rosemary in water for 15-20 minutes. Strain the mixture and let it cool. Use it as a final rinse after shampooing your hair.
- As a hair oil: Mix a few drops of rosemary essential oil with a carrier oil such as coconut or olive oil. Apply the mixture to your scalp and massage gently. Leave it on for an hour or overnight before washing your hair.
- As a hair mask: Mix dried rosemary with yogurt or honey to make a hair mask. Apply the mask to your hair and leave it on for 30 minutes before washing your hair.
Precautions
While romarin séché pour cheveux is generally safe to use, there are some precautions that you should take:
- Avoid using it if you are allergic to rosemary or any other herbs.
- Do a patch test before using it to check for any allergic reactions.
- Avoid using it if you have sensitive skin or a scalp infection.
- Consult a doctor before using it if you are pregnant or breastfeeding.
Conclusion
Romarin séché pour cheveux is a natural and effective solution for hair care. It has several benefits such as improving hair growth, reducing dandruff, preventing hair loss, and conditioning hair. There are several ways to use it, such as a hair rinse, hair oil, or hair mask. However, precautions should be taken before using it to avoid any allergic reactions or skin irritation. Overall, romarin séché pour cheveux is a great natural alternative to chemical-based hair care products.
Related video of Romarin Séché Pour Cheveux: A Natural Solution for Hair Care
Introduction
TikTok is a popular social media application that allows users to create and share short videos. If you have created a TikTok video and want to republish it, this article will guide you through the process.
Step 1: Open TikTok
The first step is to open the TikTok app on your mobile device. If you don't have the app, you can download it from the App Store or Google Play Store.
Step 2: Find the Video
Next, find the video that you want to republish. You can either scroll through your feed or use the search function to find the video.
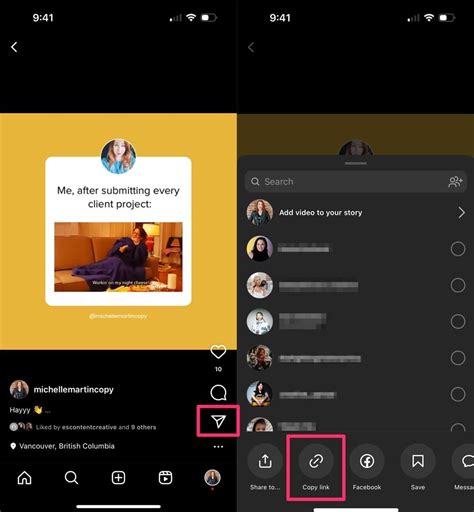
Step 3: Click on the Share Button
Once you have found the video, click on the share button located at the bottom right corner of the screen. This will bring up a menu with several options.
Step 4: Click on the "Save Video" Option
From the menu, choose the "Save Video" option. This will save the video to your device's camera roll.
Step 5: Open Instagram

Next, open the Instagram app on your mobile device. If you don't have the app, you can download it from the App Store or Google Play Store.
Step 6: Create a New Post

Click on the plus icon located at the bottom center of the screen to create a new post.
Step 7: Choose the Video

From the options, choose the video that you saved from TikTok.
Step 8: Edit the Video
You can edit the video by adding filters, text, and other effects. Once you are satisfied with the edits, click on the next button.
Step 9: Write a Caption

Write a caption for the video. You can also add hashtags to increase its visibility.
Step 10: Share the Video
Finally, click on the share button located at the top right corner of the screen to publish the video.
Conclusion
Republishing a TikTok video on Instagram is a simple process. By following the steps outlined in this article, you can share your TikTok videos with a wider audience on Instagram.